
At some point in Subnautica 2, basic resources stop being the problem. Instead, you start hunting rare crafting materials hidden deep inside dangerous biomes, and Atacamite is one of the first big progression walls most players hit.
This glowing green crystal is required for major upgrades like the Ultra High Capacity Air Tank and Mangalloy Ingots, making it one of the most important mid-game materials in Subnautica 2. Because of that, most players eventually end up searching for the best Atacamite farming locations as they begin preparing for deeper exploration and tougher survival challenges.
The tricky part is that Atacamite usually starts appearing in more dangerous underwater regions filled with maze-like cave systems, aggressive creatures, and long travel routes that can quickly drain your oxygen and power supplies. Even when you reach the correct biome, the crystal deposits can sometimes blend into cave walls, making them surprisingly easy to miss during exploration.
If you’re wondering where to find Atacamite, how to farm it quickly, or which biome has the best Atacamite deposits, here’s everything you need to know.
Read Also: Conduit Crystal Location in Subnautica 2, How to Get It, and Best Farming Route
Where to Find Atacamite in Subnautica 2
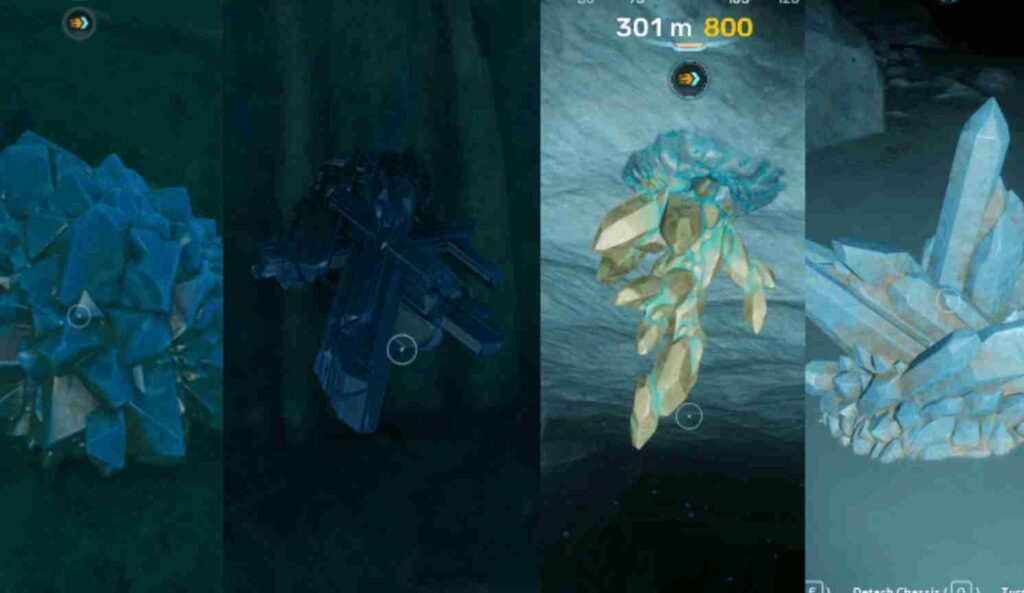
You can find Atacamite in these biomes:
- Observatory
- Root Canyon
- Power Plant
These are currently the main Atacamite farming locations players are using in Subnautica 2 Early Access. Each biome contains different amounts of Atacamite, with some areas being much safer for exploration while others are better suited for large-scale farming runs later in the game.
Most players first encounter small Atacamite crystal nodes inside the Observatory biome, but larger and more rewarding deposits become more common as you progress deeper into Root Canyon and the Power Plant region. The deeper zones usually contain higher resource density, though they also come with tougher enemies, longer travel distances, and more dangerous terrain.
Small Atacamite crystals can be collected by hand during normal exploration. However, if you want to farm Atacamite efficiently, especially in bulk, you’ll eventually need the Sonic Resonator to break large mineral deposits. These larger deposits provide significantly more resources and are currently considered the fastest way to farm Atacamite in Subnautica 2.
Best Atacamite Locations in Subnautica 2
Not every biome is equally good for farming Atacamite in Subnautica 2. Some areas are much safer for early exploration, while others are designed for larger late-game farming runs with better rewards but significantly higher risk.
Choosing the right biome depends on your current gear, oxygen capacity, vehicles, and whether you’re farming a small amount for upgrades or stockpiling materials for advanced crafting.
Observatory Atacamite Location
The Observatory biome is usually the first reliable Atacamite location most players discover during normal progression.
Here you’ll commonly find:
- Small Atacamite crystal clusters
- Cave wall spawns
- Deposits near alien ruins
- Nodes around thermal vents
Because the biome is relatively shallow compared to later areas, Observatory is considered the best early-game Atacamite farming location for most players.
This area works especially well because:
- The biome is easier to navigate
- Enemy pressure is lower
- Oxygen management is less punishing
- Farming routes are shorter and safer
Most players use Observatory for their first few Atacamite runs before moving into deeper zones later in the game. If you only need enough material for early crafting upgrades, this is usually the safest and most reliable option.
Root Canyon Atacamite Farming Route
Root Canyon is where Atacamite farming starts becoming much more efficient.
Compared to Observatory, players report finding:
- Higher resource density
- Multiple cave spawn chains
- Medium-sized Atacamite deposits
- Better looping farm routes
The biome contains more interconnected cave systems, which allows players to chain together several resource spots during a single expedition. Because of this, Root Canyon is often considered one of the best repeatable Atacamite farming routes in Subnautica 2.
However, the area can become confusing very quickly, especially during long farming trips. Many cave paths loop vertically or connect into deeper regions, making navigation difficult without preparation.
Most players recommend:
- Dropping beacons throughout the caves
- Bringing extra oxygen supplies
- Using mobility upgrades whenever possible
Once you unlock stronger oxygen tanks and better traversal tools, Root Canyon becomes one of the most efficient mid-game Atacamite farming locations available.
Power Plant Atacamite Deposits
The Power Plant biome currently contains some of the best large Atacamite deposits in Subnautica 2.
This area is ideal for:
- Bulk Atacamite farming
- Large mineral deposits
- Late-game material runs
- Sonic Resonator mining
If your goal is to farm Atacamite quickly in large amounts, this is usually the biome players eventually transition into. Large deposits here provide significantly better returns than smaller crystal nodes found in earlier regions.
That said, the Power Plant biome is also far more dangerous than Observatory or Root Canyon.
Players should expect:
- Deeper traversal routes
- Hostile creatures
- Longer return trips
- Heavy oxygen management
- Increased power consumption
Because of the added danger, most players wait until they unlock upgraded vehicles, stronger oxygen gear, and reliable power setups before consistently farming the Power Plant biome.
Once fully prepared, though, it becomes one of the best late-game Atacamite farming locations in Subnautica 2.
How to Mine Large Atacamite Deposits
Large Atacamite deposits are currently the fastest and most efficient way to farm Atacamite in Subnautica 2, especially once you start needing larger amounts for advanced crafting recipes and equipment upgrades.
Unlike smaller crystal nodes scattered around caves and biome walls, large Atacamite deposits cannot be mined by hand. Many players initially mistake these massive green mineral formations for normal environmental objects before realizing they require a specialized mining tool.
To break large deposits, you’ll need the Sonic Resonator.
Once you unlock the tool, farming Atacamite becomes significantly easier since a single large deposit can provide far more material than several small crystal pickups combined. Most late-game farming routes are built entirely around locating and mining these larger resource nodes efficiently.
Requirements for Mining Large Deposits
Before attempting deeper farming runs, make sure you bring:
- Sonic Resonator
- Extra battery power
- Deep exploration gear
- Additional oxygen capacity
Battery management is especially important because repeated Sonic Resonator use can quickly drain power during long expeditions. Many players also carry backup batteries or portable power solutions before entering deeper biomes like Root Canyon or the Power Plant.
Once unlocked, large mineral deposits become much more efficient than manually collecting scattered Atacamite crystals, making them the preferred farming method for most players progressing into mid- and late-game content.
Best Atacamite Farming Route
The safest and most efficient Atacamite farming route most players are currently using combines Observatory, Root Canyon, and eventually the Power Plant biome into a single resource loop. This route works especially well because it allows you to gather multiple important crafting materials during the same expedition instead of making separate trips for each resource.
For newer players, the route is also useful because it gradually increases in danger level, letting you turn back early if oxygen, power, or storage space becomes a problem.
Step-by-Step Atacamite Farming Route
- Start from your main base or Lifepod
- Head toward the Observatory biome first
- Follow canyon paths downward
- Collect small Atacamite crystal nodes along the route
- Continue deeper into Root Canyon
- Mine larger deposits using the Sonic Resonator
- Push into the Power Plant biome for bulk farming if fully upgraded
- Return before oxygen or battery power gets low
Most players use Observatory as the starting point because it provides safer early resource collection before transitioning into the more dangerous deeper biomes. Root Canyon is where farming becomes much more efficient thanks to denser resource spawns and better looping paths.
Once you have upgraded oxygen tanks, stronger vehicles, and enough battery reserves, the Power Plant biome becomes the best late-game section of the route for large Atacamite deposits.
Materials You Can Farm Along the Route
One of the biggest advantages of this farming path is that it allows you to collect several valuable resources during a single trip, including:
- Atacamite
- Troilite
- Deep-biome crafting materials
- Additional rare mineral deposits
Because many advanced crafting recipes require both Atacamite and Troilite together, this route helps reduce unnecessary travel time and makes progression much more efficient overall.
Many players also place beacons or temporary storage outposts throughout the route to make repeat farming runs safer and easier to manage.
Why You Can’t Find Atacamite
A lot of players struggle to find Atacamite in Subnautica 2 at first because the deposits are much easier to miss than expected, especially during early exploration when visibility and oxygen are limited.
Unlike some brighter or more obvious resources, Atacamite crystals often blend into cave walls and rocky terrain, particularly inside darker biomes like Root Canyon and the deeper sections of the Power Plant. Even experienced players sometimes swim directly past deposits without noticing them.
Some of the most common reasons players can’t find Atacamite include:
- Crystals blending into cave walls
- Nodes spawning inside deeper trenches
- Dark environments reducing visibility
- Large deposits requiring the Sonic Resonator
- Cave systems looping vertically and becoming confusing
Another major issue is that many players search too close to the surface. Larger and more valuable Atacamite deposits usually appear deeper inside cave systems or near thermal activity and alien structures.
Using beacons throughout cave networks can help prevent getting lost, while carefully scanning walls and corners often makes hidden crystal nodes easier to spot. Many players also recommend slowing down exploration speed in darker biomes since rushing through caves makes it much easier to miss resource spawns.
Best Vehicle for Atacamite Farming
Once you start farming Atacamite regularly, vehicles become almost mandatory for efficient resource runs.
The deeper biomes containing the best Atacamite deposits are often too large and dangerous to explore comfortably on foot, especially during longer expeditions involving the Sonic Resonator and multiple crafting materials.
Most players recommend bringing:
- Storage-equipped submarines
- Extra power cells
- Backup oxygen supplies
- Mobile scanner setups
Storage upgrades are especially important because Atacamite farming quickly fills inventory space once you begin mining large mineral deposits. Carrying extra batteries or power cells also helps prevent failed farming runs deep inside hostile areas.
Vehicles make a huge difference in:
- Oxygen management
- Long-distance travel
- Resource hauling
- Safe returns from deeper biomes
Once you unlock better vehicles and mobility upgrades, farming Atacamite becomes significantly faster, safer, and far less stressful overall.
What Atacamite Is Used For in Subnautica 2
Atacamite is mainly used for advanced crafting recipes tied to survival progression, deep-sea exploration, and higher-tier equipment upgrades in Subnautica 2. While it may not seem extremely important when you first discover it, the material quickly becomes essential once you begin unlocking stronger gear and preparing for deeper biome exploration.
Because several important recipes require multiple pieces of Atacamite at once, most players eventually start farming the resource in bulk rather than collecting it casually during exploration.
Ultra High Capacity Air Tank
One of the most important upgrades requiring Atacamite is the Ultra High Capacity Air Tank.
Requirements
- High Capacity Air Tank
- Troilite
- Atacamite
This upgrade massively increases underwater exploration time and is considered one of the biggest quality-of-life improvements in Subnautica 2. The extra oxygen capacity makes deep cave exploration, long farming routes, and dangerous biome traversal much safer and more manageable.
Many players prioritize this upgrade as early as possible since it dramatically reduces the pressure of constant oxygen management during mid-game exploration.
Mangalloy Ingot
Atacamite is also required for crafting Mangalloy Ingots.
Requirements
- Titanium Ingot
- Troilite
- Atacamite
Mangalloy Ingots are used in several advanced crafting chains tied to vehicle progression, upgraded equipment, and higher-tier technology. Because of this, demand for Atacamite increases significantly once players start reaching late mid-game progression systems.
Since both major recipes also require Troilite, many players farm Atacamite and Troilite together during the same expedition to save time and reduce repeated trips into dangerous deep-sea biomes.
Best Tips for Farming Atacamite Fast
If you want to farm Atacamite more efficiently, these community tips help a lot:
- Bring multiple batteries for the Sonic Resonator
- Upgrade oxygen capacity early
- Place beacons throughout cave systems
- Build temporary outposts near Root Canyon
- Farm Troilite alongside Atacamite
- Use storage modules before entering Power Plant
- Avoid deep farming trips without mobility upgrades
Preparation makes a huge difference during longer resource runs.
Is Atacamite Rare in Subnautica 2?
Early game, yes.
At first, Atacamite feels rare because:
- The best farming zones are deeper underwater
- Oxygen limitations slow exploration
- Large deposits require upgraded tools
But once you unlock:
- Sonic Resonator
- Better vehicles
- Larger oxygen tanks
- Reliable power generation
…Atacamite farming becomes much easier and more consistent.
FAQ
Where is Atacamite found in Subnautica 2?
Atacamite can be found in Observatory, Root Canyon, and the Power Plant biome.
What is the best Atacamite farming location?
Most players currently consider the Power Plant biome the best location for bulk Atacamite farming because it contains large mineral deposits.
Do you need the Sonic Resonator for Atacamite?
You only need the Sonic Resonator for large Atacamite deposits. Small crystal nodes can be collected normally.
What is Atacamite used for in Subnautica 2?
Atacamite is used for crafting the Ultra High Capacity Air Tank and Mangalloy Ingots.
Why can’t I mine large Atacamite deposits?
Large deposits require the Sonic Resonator mining tool before they can be broken.
Is Observatory a good Atacamite farming area?
Yes. Observatory is one of the safest early-game Atacamite farming locations and is ideal for smaller material runs.