
Modding Hytale can feel confusing at first, especially if you’re on Linux and trying to avoid breaking your saves.
The good news? OrbisPlace Launcher makes the whole process way simpler than traditional mod managers, and once you understand how it works, installing mods is genuinely painless.
If you just want your mods installed correctly without global conflicts, launcher headaches, or weird Linux issues, this guide has you covered.
What makes OrbisPlace especially helpful is that it doesn’t apply mods globally. Instead, mods are installed directly onto individual save files, which means you can safely run different mods on different worlds without worrying about crashes or compatibility problems. This approach is perfect for Linux users who want stability, flexibility, and a clean modding setup without manually moving files or tweaking configs every time they switch saves.
What Is OrbisPlace (And Why It’s Different)
OrbisPlace is a community-built, open-source launcher made specifically for Hytale modding. The big difference compared to CurseForge-style tools is how mods are handled.
Instead of applying mods to your entire game, OrbisPlace installs mods directly onto individual save files.
That means:
One world can be fully modded
Another can stay vanilla
No enabling/disabling mods every time you switch saves
This per-save approach removes one of the most frustrating parts of modding: managing conflicts between different worlds. You don’t need to worry about a mod breaking another save or constantly changing settings before launching a different world. Everything stays neatly separated, exactly how you set it up.
For anyone running multiple worlds, testing mods, or just wanting a cleaner and safer setup, this is a huge quality-of-life upgrade that makes modding far less stressful and much more flexible.
Before You Start (Quick Checks)
Before installing mods, make sure:
Hytale is installed and runs normally
You’re using the latest OrbisPlace Launcher
OrbisPlace has permission to write to your Hytale save folder (important on Linux)
You have enough disk space for mods or modpacks
These checks help prevent most common problems before they even happen. If Hytale doesn’t launch correctly on its own, mods won’t fix that. Running the latest version of OrbisPlace ensures compatibility with newer mods and avoids bugs that may already be patched. On Linux especially, file permissions can silently block mod installation, even when everything else looks fine.
Most Linux issues come down to permissions, not broken mods. Making sure OrbisPlace can read and write to your save directory will save you a lot of troubleshooting later and make the modding process much smoother overall.
How to Install Mods Using OrbisPlace Launcher
Step 1: Download OrbisPlace Launcher
Grab the latest version from the official OrbisPlace site.
If you’re on Linux:
You’ll likely get an AppImage
Right-click it → Properties → enable “Allow executing file as program”
Once that’s done, launch it normally.
Downloading the latest version is important, as older builds may lack support for newer mods or include bugs that have already been fixed. On Linux, AppImage files don’t always run by default, so enabling execution permissions ensures the launcher can start properly.
If the launcher doesn’t open after downloading, double-check that the file is marked as executable and that your system allows AppImages to run. Once the launcher opens successfully, you’re ready to move on to selecting your save and installing mods.
Step 2: Open the Launcher and Select a Save
When OrbisPlace opens, you’ll see your available Hytale saves.
This part matters:
Mods are installed per save, not globally
Pick the exact world you want to mod
Click “Add Mods”
Selecting the correct save is crucial, because any mods you install will only affect that specific world. This allows you to keep other saves completely vanilla or use different mod setups without conflicts. If you accidentally install mods on the wrong save, they won’t appear where you expect them.
If you don’t see your saves, double-check file permissions. On Linux, OrbisPlace needs proper read and write access to the Hytale save directory, or your worlds may not show up at all.
Step 3: Install Mods (Two Easy Options)
Option 1: Install Mods Directly From the Launcher
This is the simplest method:
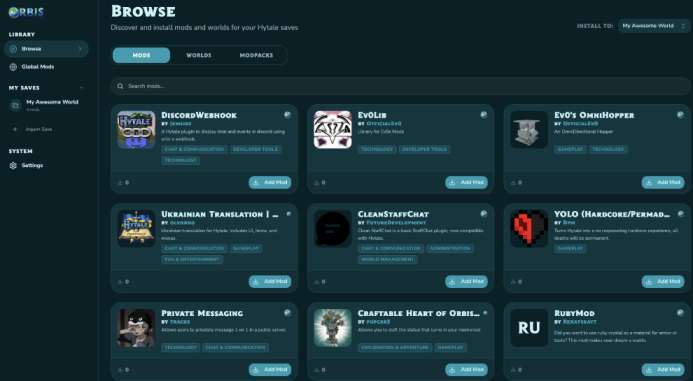
Browse mods inside OrbisPlace
Click Install
The launcher automatically:
Places files correctly
Updates config.json
Links the mod to that save
Using the built-in browser removes most of the guesswork from mod installation. You don’t need to worry about where files go, which folders to use, or how configuration files are handled. OrbisPlace takes care of everything in the background and ensures the mod is attached only to the selected save.
No manual setup required. This makes it the safest option for beginners and a fast, reliable choice for experienced players who just want to get in-game without dealing with file management.
Option 2: Install Mods From the Website
If you download mods manually:
Download the .jar or .zip
Click “Install with Orbis” (if available)
or import the file through the launcher
This option is useful if a mod isn’t listed inside the launcher yet or if a creator shares a direct download link. When using “Install with Orbis,” the launcher will automatically detect the file and install it to the selected save just like a normal launcher-based install. If that button isn’t available, importing the file manually through OrbisPlace achieves the same result.
End result is the same. The mod is placed in the correct location, linked to the chosen save, and ready to use without additional configuration.
Step 4: Launch Your Save
Once the mod is installed:
Launch the save from OrbisPlace
Mods load automatically
You’re good to go
Starting the save through OrbisPlace ensures the launcher applies the correct mod setup for that specific world. You don’t need to enable or disable anything manually, and there’s no risk of mods carrying over into other saves. If the game launches normally, your mods should be active as soon as you enter the world.
No extra toggles, no global settings. This makes testing mods quick and safe, especially if you like switching between different worlds with different setups.
Read more articles:
- Beehives in Hytale: How They Work & Whether You Can Get Honey
- Can You Manually Change Resolution in Hytale? (How to Force 1080p & Boost FPS)
- How to Find or Make Concrete in Hytale ?
Installing Modpacks (Yes, It’s Supported)
OrbisPlace also lets you install full modpacks and custom worlds.
Each modpack:
Is tied to one save
Doesn’t affect other worlds
Can be removed without breaking anything else
This setup makes experimenting with different mod combinations much safer than traditional global mod managers. You can try large modpacks, custom gameplay changes, or experimental builds without worrying about damaging your main world. If something doesn’t work as expected, removing the modpack is as simple as uninstalling it from that save.
Perfect for testing or experimenting. It’s especially useful for creators or players who like switching between vanilla gameplay and heavily modded experiences without extra setup or cleanup.
Linux-Specific Tips (Read This If Mods Don’t Work)
If mods aren’t loading on Linux, check these first:
File Permissions
OrbisPlace must be able to write to your Hytale save directory
If needed, adjust permissions using chmod
On many Linux systems, applications are blocked from modifying files unless explicit permission is granted. If OrbisPlace can’t write to the save folder, mods may appear to install but won’t actually load in-game.
AppImage Issues
Make sure the AppImage is executable
Some distros block execution by default
If the launcher doesn’t open or closes immediately, this is often the cause.
No Wine Needed
OrbisPlace runs natively on Linux, so Wine isn’t required. This helps avoid compatibility issues and keeps performance stable.
Troubleshooting Common Problems
Mods Not Showing In-Game
Make sure you installed the mod on the correct save
Restart OrbisPlace
Relaunch the save, not just the game
Because OrbisPlace installs mods per save, installing a mod on the wrong world is one of the most common mistakes. Restarting the launcher ensures it reloads the correct configuration, and launching the save through OrbisPlace (not directly through the game) makes sure the mod setup is applied properly.
Mods Installed but Not Working
Reinstall the mod
Check permissions
Avoid moving mod files manually
On Linux, missing write permissions can prevent mods from loading even if they appear installed. Moving files manually can also break how OrbisPlace tracks mods for a save.
OrbisPlace Errors
Update to the latest launcher version
Make sure config.json exists and is writable
Outdated versions or a locked config file can stop mods from loading correctly in Hytale.
Quick: Wrapping up
How to install mods using OrbisPlace Launcher (Linux compatible):
Download and launch OrbisPlace
Select the save you want to mod
Click “Add Mods”
Install mods from the launcher or website
Launch the save and play
These steps cover the entire process from start to finish and work the same across Linux, Windows, and macOS. The most important thing to remember is that mods are always installed on a per-save basis, so choosing the correct world before installing anything is essential. If mods don’t load, double-check permissions and make sure you’re launching the save through OrbisPlace.
Mods apply per save, not globally.
Final Thoughts
If you’re playing Hytale on Linux and want clean, stress-free modding, OrbisPlace is one of the easiest ways to do it right now. The per-save system avoids most common modding headaches and makes experimenting with mods way less risky.
This setup is especially helpful if you like switching between multiple worlds, testing new mods, or keeping one save completely vanilla while pushing limits on another. Because everything is isolated per save, you don’t have to worry about breaking your main world or constantly reconfiguring mods.
No overcomplication. No global conflicts. Just pick a world, install mods, and play.